TrafficCamNZ – Check for update! 6 September 2020
Posted by David Wilson in General.add a comment
#TrafficCamNZ
Check for update! – Both the Desktop and iPhone/iPad versions of TrafficCamNZ have now been released.
Here’s a reminder of what’s changed:
TrafficCamNZ Desktop
1.3.0
In this version
● Built on the latest macOS – Catalina.
● Image layout on the main view is now the same (left to right) as the TrafficCamNZ Desktop application
● Backend data sync has moved to ‘Ensembles’. Devices each trigger a data sync every 30 seconds. Please allow time for the data sync to complete.
● Default images file updated to only include camera that have received a successful image retrieval.
● Added ability to delete cameras that have a failed last retrieval – implemented as button on the utiity screen – no second chances
● The CoreData database of cameras is AutoSaved every 60 seconds – this also helps with cross device sync
● Changed the size of error text in the images to be more readable
● The size of the camera description at the bottom of images is now larger – scaled to fit the available space
● There’s a new News screen displayed at launch to provide updates on new features and usage tips
● Updates to internet location of the camera file, was Google Sites, now Amazon S3 storage
TrafficCamNZ for iPhone and iPad
1.11.0
In this version
● Improvements to onscreen messages when images are unable to be retrieved – you can now read the errors!
● Increased the size of the text displayed under images to improve readability
● AllCameras now features an increased image size
● Image layout on the main view is now the same (left to right) as the TrafficCamNZ Desktop application
● Default images file updated to only include cameras that have received a successful image retrieval.
● There’s a new News (New Features and Tips) screen displayed at launch to provide updates on new features and usage tips
● Added the ability to get back to the New Features and Tips screen after initial launch
● Updates to internet location of the camera file, was Google Sites, now Amazon S3 storage @ https://trafficcamnz.s3-ap-southeast-2.amazonaws.com/TrafficCamNZCameras.xml
● Backend data sync has moved to ‘Ensembles’. Devices each trigger a data sync every 30 seconds. please allow time for the data sync to complete.
● For those that previously chose to store their TrafficCamNZ data in iCloud – your data will be automatically migrated to local storage when the application is first launched. All cameras will be allocated a Unique ID to allow the multidevice sync to work.
● Multi-device sync – so long as your devices are signed into icloud, then the camera database, including the featured cameras for the main display, are synced across devices. Syncing can take a few minutes (please be patient).
Some further news and tips are built into the applications – details below are incorporated into a news screen in the apps.
– David
TrafficCamNZ – Updates are coming with new Data Sync! 3 September 2020
Posted by David Wilson in General.add a comment
#TrafficCamNZ
#macOS
#iOS
Both TrafficCamNZ Desktop for Mac and TrafficCamNZ for iOS have been updated – it’s time to get ready for a release. A lot has changed.
TrafficCamNZ Desktop
1.3.0
In this version
● Built on the latest macOS – Catalina.
● Image layout on the main view is now the same (left to right) as the TrafficCamNZ Desktop application
● Backend data sync has moved to ‘Ensembles’. Devices each trigger a data sync every 30 seconds. Please allow time for the data sync to complete.
● Default images file updated to only include camera that have received a successful image retrieval.
● Added ability to delete cameras that have a failed last retrieval – implemented as button on the utiity screen – no second chances
● The CoreData database of cameras is AutoSaved every 60 seconds – this also helps with cross device sync
● Changed the size of error text in the images to be more readable
● The size of the camera description at the bottom of images is now larger – scaled to fit the available space
● There’s a new News screen displayed at launch to provide updates on new features and usage tips
● Updates to internet location of the camera file, was Google Sites, now Amazon S3 storage
TrafficCamNZ for iPhone and iPad
1.11.0
In this version
● Improvements to onscreen messages when images are unable to be retrieved – you can now read the errors!
● Increased the size of the text displayed under images to improve readability
● AllCameras now features an increased image size
● Image layout on the main view is now the same (left to right) as the TrafficCamNZ Desktop application
● Default images file updated to only include cameras that have received a successful image retrieval.
● There’s a new News (New Features and Tips) screen displayed at launch to provide updates on new features and usage tips
● Added the ability to get back to the New Features and Tips screen after initial launch
● Updates to internet location of the camera file, was Google Sites, now Amazon S3 storage @ https://trafficcamnz.s3-ap-southeast-2.amazonaws.com/TrafficCamNZCameras.xml
● Backend data sync has moved to ‘Ensembles’. Devices each trigger a data sync every 30 seconds. please allow time for the data sync to complete.
● For those that previously chose to store their TrafficCamNZ data in iCloud – your data will be automatically migrated to local storage when the application is first launched. All cameras will be allocated a Unique ID to allow the multidevice sync to work.
● Multi-device sync – so long as your devices are signed into icloud, then the camera database, including the featured cameras for the main display, are synced across devices. Syncing can take a few minutes (please be patient).
Some further news and tips are built into the applications – details below are incorporated into a news screen in the apps.
NEWS
There is this new fancy news screen presented in a traditional “Green Screen” – WAIT – read this – you can get back to this screen by clicking the splash bubble at the top of the screen – its next to the preferences button!
IMAGE LAYOUT
The image layout on the iPad screen now matches the layout on the macOS Desktop, this is especially important when you show 16 images on the scren at the same time. Both iPad and macOS will now share the same layout across both devices.
CAMERA SYNC BETWEEN DEVICES
TrafficCamNZ has been internally upgraded to use a new sync technology bewtween devices.
Sync of cameras between devices can take at least two minutes and is dependant on a “save” being completed on the device where a change has been made. One of the new features is an autosave every 30 seconds.
DATA MIGRATION
Your existing camera data will be automatically updated to use the new sync mechanism. It will use a small amount of iCloud storage for this.
For previous users of TrafficCamNZ who chose to use iCloud for your camera storage this feature is not longer being used and your data has been migrated.
DEFAULT CAMERAS
The builtin default cameras that are used as part of the initial load has been cut down to only include valid cameras. Over the years many of the camera sources have changed and no longer exist and thus do not return an image any more. All of the image links present at this time do return an image.
TIPS AND TROUBLE SHOOTING
It is possible to get the sync confused initially, especially if you’re syncing to multiple devices and the storage of both devices is migrated to the new system at the same time. You may see duplicate cameras presented. This is solved by manually deleting one of the cameras (it won’t matter which device you do this on). You’ll also need to allow time for the save and sync across devices to complete. This is helped by having the macOS desktop software autosave every 30 seconds.
Syncing with an iPad. Assuming your macOS desktop version of TrafficCamNZ is where you setup and manage your cameras it maybe best to next delete the old TrafficCamNZ application off the iPad – this will remove the application and the data. Next re-download TrafficCamNZ from the AppStore, on the iPad, run the application to go through the first time install. Let the the cameras Sync across the cloud onto the iPad. This could take from 2 to 5 minutes – depends on how much data you have. Now you’re done. Now make changes on the iPad they will sync back to the desktop or other devices.

These applications are completing the AppStore review and approval process – they should be available for release soon.
– David
TrafficCamNZ – Camera Update URL has changed 9 August 2020
Posted by David Wilson in General.add a comment
#TrafficCamNZ
The update URL for TrafficCamNZ has changed. It is now:
https://trafficcamnz.s3-ap-southeast-2.amazonaws.com/TrafficCamNZCameras.xml
[URL Updated from original post]
This unexpected changed has occurred because I migrated the Google Site that was holding the file to the new style of Google Site. Oops.
An application update will be issued with a new release of both the macOS Desktop and iOS applications. Until then on iOS you can update the URL if you wish.
This is also a updated file that contains only known working cameras and adds unique identifiers for all cameras which is a required migration path for the new version of the application.
Apologies for any issues this change may cause.
– David
Moments v1.3 has been release on the Mac AppStore 2 August 2020
Posted by David Wilson in General.add a comment
A new release of Moments has been released.
Critically it fixes a crash on macOS Catalina. The fix deployed is a work around for now. The image details off the camera will not display certain image information.
In addition I’ve been informed that the the software does work with a Nikon D80!
In this version
● Support for macOS 10.15
● Added security permissions requests for Photos
● Some image column information has been removed from the main display as this was causing a crash in 10.15

– David
Power BI – Date Filter Selection 1 July 2020
Posted by David Wilson in General.add a comment
#PowerBI
#DAX
#DateTime
#UTCNOW
Last month I presented via Zoom at a Wellington Power BI User Group meeting. The subject Date and Time – it’s a recurring theme in Q&A in a number of forums at the moment. If you’ve got questions on that I highly recommend you download an inspect the PBIX file that accompanies this post. The trick then is to publish it to the Power BI service and note the differences (or not) between the dates and times on the Service vs. your desktop.
In that same PBIX file was a TAB for Date Filter Selection that demonstrated a special ability to always filter dates based on a calculated column. The best example of this is where you want to “default” to “Now”… naturally “Now” is a constantly moving target and Power BI doesn’t let you establish moving default values…. but it does and this page demonstrates that work around.
In addition I have also added a filter that allows the user to select the current week (or week ending). This too is demonstrated on that same page.
1. The “User Date” column is a DAX created column. It will contain text of a Date string or “Now!”. Selecting Now! in the filter will select the date row as shown (2 July 2020). If the filter never changes and the user reloads the page on another day, Now will effectively shift days.
2. The “User Date WeekEnding” column a DAX created column. It contains a text string, that looks kinda like a date, that aligns the Date to a weekending (or beginning – you choose). Selecting any given WeekEnding in the filter (shown here in BLUE) filters the date table to be all the days of that week.
Here’s an image of the Date Filter Selection tab.
Below please find the link to the PBIX file for you to inspect and understand.

https://sites.google.com/site/dgwilson65/DateandTime.pbix?attredirects=0&d=1
I’m keen to get feedback on this – has it been useful for you? Please use the comments area.
– David
TrafficCamNZ – Desktop – time for an update 6 June 2020
Posted by David Wilson in General.add a comment
#TrafficCamNZ
#macOS
TrafficCamNZ Desktop for macOS has received some enhancements recently that I think help improve the look and usability of the program.
So far the changes/enhancements look like this:
● Bug fixes for for background thread initiation when building on a later version of the OS (macOS Catalina) – there’s a good chance a crash may have been exterienced if autorefresh was enabled – that’s now been fixed
● Improvements to messaging when images are unable to be retrieved – you can now read the errors!
● Increased the size of the text displayed under images to improve readability
● Built on the latest macOS – Catalina.
● Fixed some Storyboard constraint errors/warnings – always good housekeeping
You can tell from the screenshot below that it’s now dark and wet outside! You can also see the increased font size of the image description below the images… and that the description now also appears even below the images that have failed to be retrieved. Error messaging is also larger on each image.

– David
David Wilson
https://dgwilson.wordpress.com
https://nz.linkedin.com/in/dgwilson65
PowerBI DAX, Slicers, Disconnected Tables and using Relationships 10 February 2020
Posted by David Wilson in General.add a comment
#PowerBI
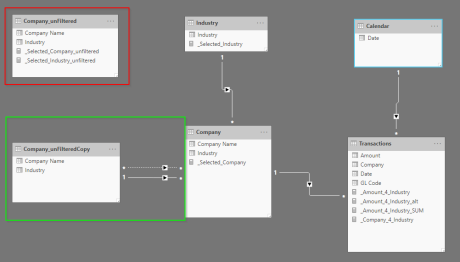
In a previous post I had put forward a solution for user scenario where a SELECT tab presents a list of Companies that the user can choose one company from and on another tab the user is presented with that same company and others in the same Industry.
The solution(s) are not easy because the slicer from the SELECT table is Sync’d to the tab where I want the results to be displayed and by default restricts the display to the single selected company.
The original post solutioned that it could be solved with a “disconnected copy of the company table” and some DAX. Through one of the comments “AkhilAshok” proposed a upgraded solution with a nice clean implementation. It is worth looking into this as there are a couple of tricks to understand and trying to retrofit it into an existing model may cause some grief if you do not understand the implementation in the demo.
So if you are looking to implement this I recommend you consider the implementation carefully in terms of how it fits into your model with regard to the relationships of your tables.
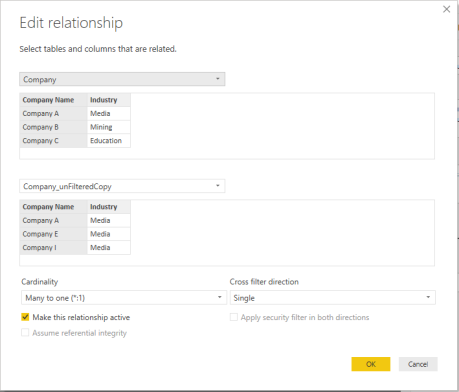
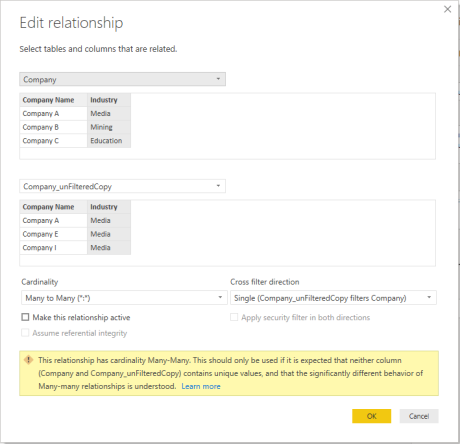
The picture above shows (with the red square) my original “disconnected copy of the company table”. The table with the green highlight around it is also a copy of the company table with an active and unactive relationship back to the Company table. Take special notice of the direction of the relationship.
If you are trying to retrofit this into your existing Power BI model you need to ensure that you can do this. For this solution to work the Company selector on the SELECT tab needs to use the “Company_unfilteredCopy” table where previously I was using the “Company” table.
The relationship definitions are as follows:
Two final pieces of the puzzle to make the data present in a matrix.
- The DAX – see below
- The Matrix setup of the columns – it uses the Company Name and Industry from the original Company table.
The DAX:
_Amount_4_Industry_alt =
CALCULATE (
    SUM ( Transactions[Amount] )
    , USERELATIONSHIP ( Company_unFilteredCopy[Industry], Company[Industry] )
    , CROSSFILTER ( Company_unFilteredCopy[Company Name], Company[Company Name], NONE )
)
The picture below shows the working solution (on the right). The matrix on the left is the original implementation.

The updated pbix file can be downloaded here. https://sites.google.com/site/dgwilson65/Industry%20Selection%20Fix2.zip?attredirects=0&d=1
Good luck on your implementation if you choose to use this.
PowerBI DAX Slicers, Calculate, SUMX 31 January 2020
Posted by David Wilson in General.9 comments
#PowerBI
I have a scenario that I’ve worked through recently that involved some out of the box thinking and a shallow dive into some DAX and the inner workings of SUMX.
The sample PBIX and datafile can be downloaded from here.
https://sites.google.com/site/dgwilson65/Industry%20Selection%20Fix.zip?attredirects=0&d=1
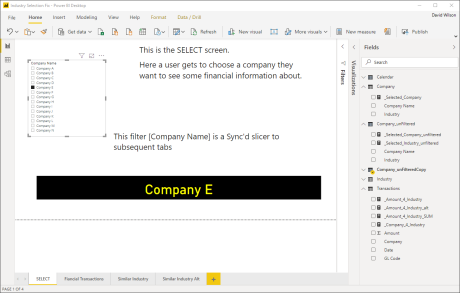
The user interaction with this Power BI report is to use the SELECT tab to select the Company they want to review some financial transactions for.
In the demo pbix file you can choose a company with the selected company being confirmed by the Measure output (yellow text on the black background).
The Company Name slicer is Sync’d on all subsequent tabs of the report – it’s shown on the SELECT tab and hidden on subsequent tabs.
Each company is associated with an Industry, so the intent is to show financial performance for all companies in the same industry as the selected company.
Picture-1 shows the data loaded to the Company table and which industry each company is associated with.

Picture-1
Picture-2 shows the PowerBI desktop where Company-M has been selected and the measure on screen confirms the selected Company.

Picture-2
Picture-3 shows the next tab where the hidden sync’d slicer restricts the displayed data to the company selected on the SELECT screen. It shows the financial transactions for the company across 5 months presented in a Matrix.

Picture-3
The third tab (Similar Industry) is where I want to display a summary of the financial transactions for all companies in the same industry as the company selected. Picture-4 shows what I want to see. The challenge is that the Sync’d Company slicer restricts reporting on the page to just the company selected in the slicer (i.e. the company on the SELECT tab). To deliver the required results a measure is required that calculates the result required.

Picture-4
What is required here is a Measure that calculates the value for each cell. It is a simple CALCULATE with a SUM and some filtering that lets me see all of the transactions for all companies.
First the Matrix. Importantly the columns Industry and Company Name. If these come from the company table they are restricted to showing only the company from the Sync’s slicer. This does not work for what is needed to be shown. To work around this I created a copy of the Company table called Company_unFiltered. The Matrix shows columns from this table. The unfiltered table has no relationship to any other tables (i.e. established in the datamodel). From the Modelling menu create a new table and use this DAX to create it.
Company_unFiltered = CALCULATETABLE(Company)

Picture-5
Now the DAX measure has the information required to calculate some numbers for us. DAX allows me to determine what the user has chosen in the slicer and further the Industry associated with that particular Company.
VAR industry_local = SELECTEDVALUE(Company[Industry])
And as the Measure calculates for each row and column we need to calculate an amount for each cell. To do that we need to know where we are and calculate that amount accordingly. To understand which row the measure is calculating the ISFILTERED DAX command is used.
VAR myGLCode = SELECTEDVALUE(Transactions[GL Code])

VAR myCompany = SELECTEDVALUE(Company_unFiltered[Company Name])

VAR amount 3 = IF(ISFILTERED(Company_unFiltered[Company Name]),
     IF(ISFILTERED(Transactions[GL Code]),
        CALCULATE(
            SUM(Transactions[Amount]),
            ALL(Company)
            , Company_unFiltered[Industry] = industry_local
            , Transactions[Company] = myCompany
            , Transactions[GL Code] = myGLCode
         )
After the calculation is complete the Measure returns a result. The result is only returned for Companies in the same industry. This means that if there is no data to present the column is not presented in the Matrix.
RETURN
         IF(industry_local IN FILTERS(Company_unFiltered[Industry]),
             amount3
           )
The snippet of DAX presented above will calculate the SUM of transactions for a Company in the same Industry as the selected company and for each of the GLCodes as each row and column in the Matrix is iterated through. This is works well until you come to the total of the column and total of the row. Below is the full DAX measure used to provide the result. Examining it in more detail you can see that the ELSE conditions of the IF statement have an altered filter condition in the CALCULATE that remove the filter of the GLCode.
_Amount_4_Industry =
VAR industry_local = SELECTEDVALUE(Company[Industry])
VAR myGLCode = SELECTEDVALUE(Transactions[GL Code])
VAR myCompany = SELECTEDVALUE(Company_unFiltered[Company Name])
VAR amount3 = IF(ISFILTERED(Company_unFiltered[Company Name]),
       IF(ISFILTERED(Transactions[GL Code]),
            CALCULATE(
                SUM(Transactions[Amount]),
                ALL(Company)
                , Company_unFiltered[Industry] = industry_local
                , Transactions[Company] = myCompany
                , Transactions[GL Code] = myGLCode
                ),
            CALCULATE(
                SUM(Transactions[Amount]),
                ALL(Company)
                , Company_unFiltered[Industry] = industry_local
                , Transactions[Company] = myCompany
                )
          ),
       IF(ISFILTERED(Transactions[GL Code]),
            CALCULATE(
                SUM(Transactions[Amount]),
                ALL(Company)
                , Company[Industry] = industry_local
                , Transactions[GL Code] = myGLCode
            ),
            CALCULATE(
                SUM(Transactions[Amount]),
                ALL(Company)
                , Company[Industry] = industry_local
            ))
        )

return
       IF(industry_local IN FILTERS(Company_unFiltered[Industry]),
             amount3
          )
All of that is rather messy and can be challenging to debug. There’s an easier way! The DAX function SUMX helps us. It is an Iterator function that works through a table Row by Row (refer to the separate note care of Matt Allington on SUM vs. SUMX).
SUMX handles the column totals automatically although management of the column and column totals still needs filtering. The DAX below is a lot less complicated.
[Update 3 February] – Marco Russo posted a comment correctly advising that SUM can be used within the CALCULATE statement. I’ve modified the code below for this. The text around this post has not been updated at this time.
_Amount_4_Industry_SUM =
VAR industry_local = SELECTEDVALUE(Company[Industry])
VAR company_local = SELECTEDVALUE(Company_unFiltered[Company Name])
VAR amount2 = IF(ISFILTERED(Company_unFiltered[Company Name]),
                  CALCULATE(
                     SUM(Transactions, [Amount]),
                     ALL(Company),
                     Company[Industry] = industry_local,
                     Company[Company Name] = company_local)
                  ,
                  CALCULATE(
                     SUM(Transactions, [Amount]),
                     ALL(Company),
                     Company[Industry] = industry_local)
                   )

return
        IF(industry_local IN FILTERS(Company_unFiltered[Industry]),
              amount2
           )
Picture-6 shows the final tab in the demo pbix file and both the results of the SUM and SUMX measures.
You can go back to the SELECT TAB and choose another company, from a different industry, return to this TAB and see the updated report based on the industry associated with the selected company.

Picture-6
Credit to Matt Allington
https://exceleratorbi.com.au/use-sum-vs-sumx/

– David
TrafficCamNZ with DarkMode support 7 January 2020
Posted by David Wilson in General.add a comment
New for 2020 TrafficCamNZ has been updated with the following enhancements and fixes:
● Minimum iOS support level is now iOS 11.0
● Supports Dark Mode and it rocks!
● Fixes an issue where the Camera name got progressively overwritten in the All Camera tab. It is clean and beautiful now.
● Fixes a preferences issue on iPad that prevented the Predictive mode from being turned on
● ChromeCast support upgraded for version 4.4.4 of the ChromeCast SDK to support iOS 13
A note about ChromeCast support
– it requires access to WiFi, Bluetooth, and Microphone – so TrafficCamNZ will request your permission to access these.
– Uses microphone access to listen for ultrasonic tokens when pairing with nearby Cast devices.
– Uses Bluetooth to discover nearby Cast devices.
– Uses WiFi to discover nearby Cast devices – and to access web cameras/traffic camera data for display

TrafficCamNZ will be available on your iOS device shortly via the standard AppStore Software Update.
– David
David Wilson
https://dgwilson.wordpress.com
https://nz.linkedin.com/in/dgwilson65
Take a Moment with macOS 10.15 9 November 2019
Posted by David Wilson in General.3 comments
My macOS Moments application needs a little bit of refinement to work under macOS 10.15.
For now if you want to run the Moments software you’ll have to stay with macOS 10.14.
![]()
Here is the link to Moments in the AppStore https://apps.apple.com/nz/app/moments/id1194414752?mt=12
For those interested in details under the hood… and to assist other developers with some diagnostics.
I’m performing all of my diagnostic work while running macOS 10.15 and testing directly in Xcode.
I encountered issues with the call to “requestOpenSession” and did not receive the downstream delegate call backs to “device:didOpenSessionWithError:”.
I found that changing the deployment target from 10.12 to 10.13 and performing a clean and build now allowed the application to function correctly. The Camera session would open and allowed the application to display images on the camera.
During these diagnostics I’ve been struggling with “requestTakePicture”.
Firstly I lost control of the camera in that I couldn’t;t even use the shutter on the camera to take a picture and through the viewfinder the camera reported “busy”.
With the change in deployment target to 10.13 this seems to have changed in that I can now user the shutter on the camera.
I’m still unable to take a picture triggered by “requestTakePicture”.
Here are the device details, note the device capability “ ICCameraDeviceCanTakePicture” is present:
ICCameraDevice <0x10203cf70>:
delegate : <0x6000039108f0>
deviceRef : 0x10000069
connectionID : 0xad6a3562
deviceID : 0x0200002b
name : Canon EOS Kiss X6i
locationDescription : ICDeviceLocationDescriptionUSB
iconPath : /System/Library/Image Capture/Support/Icons/GenericCamera.png
softwareInstallPercentDone : 100.000000
modulePath : /System/Library/Image Capture/Devices/PTPCamera.app
moduleVersion : (null)
moduleExecutableArchitecture : 0
type : 0x00000101
UUIDString : 00000000-0000-0000-0000-000004A9323B
persistentIDString : 00000000-0000-0000-0000-000004A9323B
autolaunchApplicationPath :
capabilities : ICCameraDeviceCanTakePictureUsingShutterReleaseOnCamera
ICCameraDeviceCanTakePicture
ICCameraDeviceCanDeleteOneFile
ICCameraDeviceCanAcceptPTPCommands
shared : NO
transportType : ICTransportTypeUSB
usbLocationID : 0x14500000
usbProductID : 0x323b
usbVendorID : 0x04a9
usbIntefaceClass : 0x00
usbInterfaceSubClass : 0x00
usbInterfaceProtocol : 0x00
timeOffset : 0.000000
hasConfigurableWiFiInterface : N/A
isAccessRestrictedAppleDevice : NO
I have also tested Deployment Target of 10.15 – this had not had a difference in behaviour.

Next update when I have more to tell.
– David
David Wilson
https://dgwilson.wordpress.com
https://nz.linkedin.com/in/dgwilson65

